


Choosing an excavator bucket size is essential for a successful job. The correct option can transform how smoothly your project runs, improving cycle times and making every pass count. It helps you move material efficiently, controls fuel consumption and keeps your crew working at peak productivity.
However, there’s a balance to strike. An undersized bucket slows progress by forcing you to make extra passes, while an oversized one can strain hydraulics and accelerate equipment wear.
Explore our guide to find the excavator bucket size that delivers optimal performance.
Every excavator has limits defining how much material it can safely handle.
Manufacturers classify excavators by tonnage, linking each weight class to the machine’s structural strength and balance. For example, a six-ton excavator is excellent for compact jobs and tight spaces, while a 30-ton machine can tackle digging and heavy demolition tasks.
Buckets need hydraulic power to dig, lift and dump material. Hydraulic flow and pressure determine how well the bucket performs when it digs into soil and how fast it cycles. An oversized bucket can strain the hydraulics, slow cycle time and burn more fuel.
Original equipment manufacturers provide thorough information in the manuals or spec sheets, including details about each model’s tonnage, lift capacities and ratings. A dealer can determine the adjusted capacities if you have a modified machine.
Once you know your machine’s limits, match excavator bucket types and sizes to the material type and project. Material density and job type go hand in hand because they determine how much stress the bucket puts on the machine and how efficiently you can complete the job.
Material density varies widely. Imagine you have two equal-sized buckets — one filled with rocks and the other with sand. Because rocks are denser than sand, the rock-filled bucket can weigh several times more, placing additional strain on your excavator and affecting fuel efficiency, cycle times and performance.
Since capacity alone can be misleading, you must consider volume and weight. Here’s how that plays out with a 20-ton excavator.
Each project requires careful attention to varying jobsite conditions and equipment.
Bucket charts or specs from attachment OEMs, like Werk-Brau, show what is safe for load-bearing activities. Here’s the data you’ll usually find in bucket spec charts.
While online resources like BigRentz offer simple sizing charts, consulting with equipment experts ensures you get the perfect match for your application. Look for buckets that match your machine’s pin dimensions, stick length and hydraulic force limits.
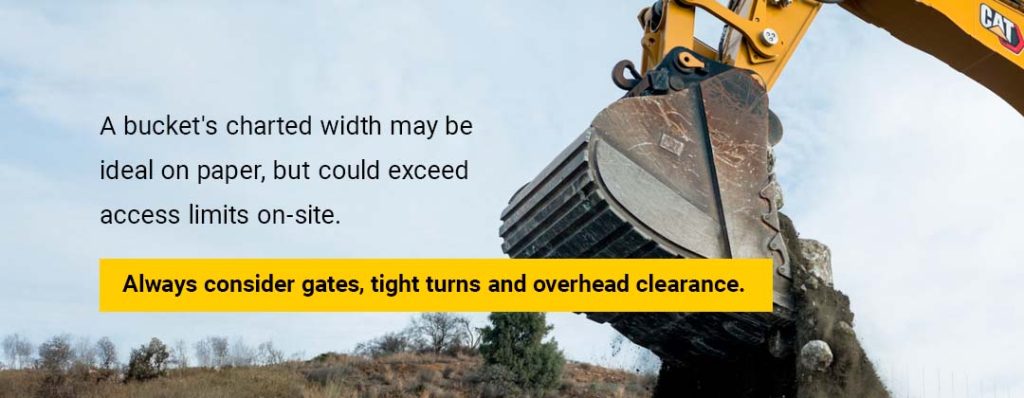
Remember, a bucket’s charted width may be ideal on paper, but could exceed access limits on-site. Always consider gates, tight turns and overhead clearance.
To calculate an excavator bucket’s capacity, first find the struck capacity, or the volume of material a bucket holds when level with the top edge. Then, determine the heaped capacity, the volume a bucket holds when slightly overfilled.
Thoroughly clean the bucket to remove debris, then measure:
To calculate the struck capacity, multiply the length by average width by average depth.
For example, a bucket with internal dimensions of 30 inches L x 18 inches W x 20 inches H will have a struck capacity of 10,800 cubic inches.
This factor adjusts the struck capacity to account for mounded material above the bucket’s rim. It typically ranges from 1.1 to 1.3 for most earthmoving tasks.
Use the formula (volume x heaping factor) ÷ 1,728 to convert from cubic inches to cubic feet.
Here’s an example using the previous dimensions and a heaping factor of 1.1.
In other words, your excavator bucket can reasonably hold 6.875 cubic feet of material when piled in a heap.
For bulk material calculations and job estimates, you can further convert to cubic yards to calculate how many truckloads of material you’ll move or how many passes you’ll need to complete an excavation. To convert to cubic yards, divide the cubic feet by 27. This formula will tell you that your excavator bucket can hold approximately 0.25 cubic yards, the standard unit used for some construction and excavation projects.
Gregory Poole has over 70 years of experience helping fleet owners and operators find the ideal excavator bucket for their projects. We offer new and used equipment and attachments, including genuine Cat® buckets and other quality manufacturing brands. Browse our catalog to view our full selection.
Our parts distribution network gives you access to teeth, edges, adapters and wear components, so your buckets stay in top condition. We also offer financing solutions to make equipment acquisition accessible. Contact us today to learn more.